December 21, 2013

A Christmas treasure box for Alexis

Over the past few months or so I have been working on a small treasure box that will be a Christmas gift for my daughter. This project seemed like a perfect use for some of the spalted 6/4 curly maple I have stashed away. I haven't used any of this wood yet so I really wasn't sure what the inside of this board would look like after resawing it and planing it down.


I crosscut off a section that would yield the length needed for the box and it was cool to see that the lines and colors from the spalting went all the way through the board.


I then ripped this piece down the middle and set aside half for another project.


I re-sawed the remaining piece down the middle to create two bookmatched pieces. By flipping these pieces inside out I can then create a box continuous grain at all four corners.


Next I jointed and planed these pieces to get them flat and even in thickness. Then I setup a dado stack in the table saw and ran a 1/4" groove along the top and bottom edges to capture the panels that will make up the top of the lid as well as the bottom of the box. I also cut a wider groove located about 3/4 of the way up the side which will is where the lid will be split from the box later on. This groove will then get some small strips of wood glued on which will serve to register the lid onto the box.


Next I used a set of dividers to layout the proportions of of the front and sides and then mark out which pieces will become the front, sides, and back of the box.


The front, sides, and back of the box will be joined at the corners by a miter joint and reinforced with a vertical spline along the length of the miter. After setting up the table saw to cut a decent 45 degree angle (this took a few test cuts) I crosscut the pieces.


The time spent tweaking the angle of the table saw was well spent as the box came together with nice tight miters.


The next step was to setup the table saw to cut the grooves along the miters for the splines at each corner. I clamped a sacrificial scrap to the table saw fence and bumped it right up to the blade get the groove in the right spot.


Below you can see how the splines will sit across the miter and provide some long grain to long grain glue surface to make a nice strong joint.


I couldn't help taping the box together to get a feel for the proportions and the continuous grain around the corners.


At this point I shifted focus to the panel for the lid. I wanted to use a contrasting wood and was initially thinking a nice piece of walnut would look nice but I ended up finding a nice piece of cherry that was just the right size and had some nice cathedral grain.


I crosscut the piece from the larger board and then roughly flattened it by hand.


I then ran the board through the thickness planer to make both faces flat and parallel.


I then started working on cutting the features that would interlock with the groove around the top edge of the box. I started with a saw kerf that defines the thickness of the tab that fits into the groove.


Next I cut another saw kerf to fit over the top edge of the box and also removed all of the material in between.


I then trimmed back the lower tab to fit the dimensions of grooves with the box assembled. Below you can see the lid panel upside down. The longer tab will overlap the top of the box and will be trimmed back later.


Below you can see the lid in place with some mineral spirits applied to highlight the grain. Over time the cherry will darken even more enhancing the contrast against the lighter maple.


To close out the box I then started working on a panel for the bottom. I didn't have any thin stock wide enough to span the box with a single piece but I did have some thin oak stock that would work well once glued into a wider panel. I planed the stock down to a consistent thickness and then used a jointer plane to true up the edges for the glue joint.


It's now too cold outside for the glue to cure properly so I headed down to the basement with a few clamps.


I used the wooden hand screws to keep the thin pieces aligned and clamped them up with the parallel clamps.


After the glue cured I ran the panel through the planer to even up the glue joint and bring the panel to just the right thickness to fit the groove in the bottom of the box. I then trimmed the panel down to fit the dimensions of the box.


The pieces of oak that make up the bottom were both straight grained so the glue joint doesn't stand out much, good enough for a box bottom.


With the bottom complete I shifted focus to the lid, trimming back cherry panel to overlap the box edges a bit. To my eye this looks a bit nicer and also exposes the splines that reinforce the mitered corners.


Before assembling the box I used a side piece as a gauge to test the cherry strips that would eventually register the lid to the box as I planed them down to just the right thickness to fit into the groove.


At this point I pre-finished the lid, the bottom panel, and the inside surfaces of the sides. I typically use wipe-on poly for most projects but since the oil based poly tends to stink forever in an enclosed area, I decided to use shellac for this project.


After playing around with a few assembly dry runs I realized it wasn't going to be easy getting all the mitered corners to close up tightly. I decided to glue on some 45 degree blocks at each corner to allow clamps to be applied to apply pressure right across each miter. I applied a few drops of glue and simply rubbed the blocks onto the box sides.


Once the glue blocks were dry I moved forward with the assembly. It was a bit of a trick to get the bottom and top panels in place, apply glue to the miters and insert the splines, and then get all the clamps on as quickly as possible. As I was tightening up the clamps the last few turns two of the glue blocks popped off, teaching me a good lesson that they need to be glued on a bit more carefully next time. Unfortunately the missing glue blocks prevented me from pulling on of the miters completely closed leaving a small gap at the back right corner.


After letting the glue dry I took the box back out to the shop to trim off the glue blocks and splines at the corners.


The splines came off fairly easily with a sharp chisel.


I attacked the glue blocks on the bandsaw to remove most of the scrap.


I then planed off the last fraction of an inch with the block plane...


...and then followed that up with the smoothing plane to clean up the outside surfaces of the box one last time. Overall removing the glue blocks wasn't bad, I'll most likely use this technique again on miters like this but I'll make sure to glue them on a bit more carefully next time.


I then eased the corners of the box with the block plane, rounding them over slightly. I also added a small bevel on the cherry panel in the lid.


When it was finally time to separate the lid from the box I setup the table saw to cut just a hair short of the thickness of the side, taking into account the depth of the groove on the inside.


I sawed all four sides and then cut through the remaining paper thin connection with a knife to release the lid.


I then went back to the cherry strips I had cut and planed to thickness earlier, and mitered them to fit into the top of the box. These strips were then glued in forming a lip to register the lid.


At this point the box was mechanically complete and I moved on to the finishing process. I ended up wiping on multiple coats of shellac, sanding between coats. I wasn't able to get a perfectly smooth surface just wiping on the shellac so I ended up wet sanding the last coat with 400 grit wet/dry lubed with a bit of mineral spirits to even out a few imperfections. I finished that off with some paste wax applied with a green scotchbrite and buffed it out to a decent satin gloss.


Overall the shellac and wax combination left a nice smooth finish that is as nice to touch as it is to look at.


This box should be a nice container for a few small Christmas gifts and should also make a nice little treasure box after that.


November 17, 2013

Lumber Hoarding Continued - Black Walnut Score

I have a problem. I am a lumber hoarder. Despite the fact that the lumber rack in my garage is well stocked I can't resist checking craigslist occasionally for a good deal on hardwood or an opportunity to pick up something unique (figured, thick, or wide stock). Last week I ran across a post for a stack of black walnut that fit both criteria. The stack consisted of around 200 board-feet of 4/4 air dried stock with the bulk of it being 16" wide, 16' long, and mostly clear except for a few splits and checks. There were also a few smaller live edge pieces in the mix. The stack was listed for $500 but the seller really wanted it out of the way so I was very happy when we settled at $375 or about $2/bdft after factoring in gas and lunch for the trip to pick it up down in Horicon. Hauling 16' lumber in my short box F150 isn't an option so we ended up cutting each piece down into 10' and 6' sections for the trip home. I hated to cut down those long pieces but we left the best sections 10' long to maximize their usefulness and in most cases the shorter sections contained most of the splits and checks and will still yield plenty of usable pieces of smaller dimensions.


I checked the cut ends with a moisture meter and they measured between 11% and 15% moisture content so I stacked and stickered the pile in the south facing back porch off the rear of the garage to allow it to equalize and dry out a bit more. 


With my lumber rack nearly full and this stack taking up room in the back porch I now have plenty of wood for the next few projects on the to-do list and it is time to make some furniture and take a break from wood hunting on craigslist. 

Thanks again Mark for the help, you are an enabler.

October 17, 2013

A bookshelf for Little Man

Back in July Laura mentioned that she was looking for a bookshelf for the nursery we were preparing for Little Man, our loving code name for the child we are expecting later this fall. As a woodworker I took her suggestion that we buy one as an insult and immediately offered to build one instead. Based on the typical pace of my projects Laura was concerned that this bookshelf might end up dragging out until Little Man's first birthday, but she reluctantly agreed under the condition that it was done by the end of September. I figured a bookshelf should be doable in 2 months...

Challenge accepted.

I had initially hoped to use lumber from my stockpile but the looming deadline had me looking to keep this as simple as possible so I decided to head over to H&K Woods to see if they had any wide stock so that I could avoid the need to glue-up panels to get the full depth needed. They had a fresh stack of red oak and I was able to grab 5 nice wide boards that were almost perfectly clear.


After looking over the lumber I decided cross cut the nicest board in half for the sides of the shelf and let the length of those pieces set the height (~48"). 


This height would fit 4 shelves with reasonable spacing and dividing an 8' board into thirds set the width of the shelf at roughly 32". This also meant that this load of lumber would yield two of these bookshelves so I'll probably end up building another one for Lex some day.


It was nice to finally put the workbench to use on a real project, starting with flattening one side of each rough piece with a jack plane and a pair of winding sticks.


I then ran the boards through the planer starting with the flat face down on the table to true up both faces and bring the sides and shelves to a consistent thickness of just under one inch.


At this point I started playing around with some whole number ratios to define the locations of the shelves. Through some trial and error I settled on a ratio of 9, 11, 13 for the shelf to shelf spacing and then added in another 5 units for space above the top shelf and 3 units for the space below the bottom. I then set the dividers to step off the overall height into the 41 total units and then made marks at 5, 9, 11, and 13 steps from the top leaving 3 steps below the bottom shelf. This may seem complicated at first but it is very simple in practice and it allowed me to locate the shelves and layout the design without the need for a tape measure or any math (other than counting).


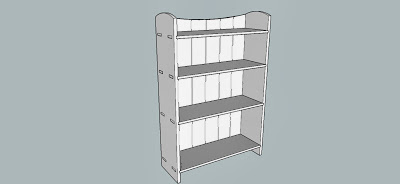
Stepping back into the 21st century I also modeled this design in sketchup as a sanity check and to get a final stamp of approval from the wife. The sketchup model was helpful to visualize the curves whose degrees of curvature were also based on the same whole number proportions as the rest of the shelf. The model also helped me decide how to handle the termination of the back boards at the top of the shelf. I had initially considered some sort of cross piece to cover the end grain of the back boards but ended up leaving them exposed and dressing them up with the curve across the back as shown below.


With the design finalized and the stock milled flat and to thickness I started working on the shelf joinery. I started by cross cutting the sides to final length, plowing a dado for each shelf with the dado stack, and then ripping the sides to final width.


Next I crosscut the shelves to their final length, used the dado stack to cut the full width tenons to fit the dados previously cut in the shelf sides, and then ripped the shelves to final width.


Next I plowed a groove along the inside back edge of each shelf side to capture the back boards.


The next step was to mark out the mortises in the sides for the twin through-tenons with the dividers. Each tenon is one sixth of the width of the side and is located 1 sixth from the edge, with 2 sixths between them. I used the two pieces of scrap shown below to help visualize this layout.


I started the mortises by marking out the locations inside of the dados on the inside of the shelf sides. The sidewalls of the dado set the mortise width and the length were marked out with a knife.


I used the brace and the closest size auger bit to hog out most of the waste, starting from the inside and then finishing from the outside to get nice clean holes.


I transferred the layout lines for the mortises to the outside faces of the shelf sides and then started chopping out the remaining waste inside those lines with a chisel. The final dimensions are set by starting the last fine cut with the chisel placed right in the knife line so that the mortises are all a consistent size.


This process started out fairly slow and could have probably been sped up by using a router and a template, but it was fun chopping these out by hand. After the first few sets it picked up quite a bit.


I did have a few issues where I got careless and ended up splitting off a chunk of the outside face while paring the mortise walls from the inside.


I was lucky that in most cases the split off pieces remained attached so that I could simply glue them back in place.


This particular patch job wasn't perfect but it isn't too obvious on the finished shelf and without this simple repair I wouldn't have had any chance to get this project done on time.


With the mortises cut it was time to set the shelves into the dados and use a knife to mark off the tenons based on the mortises.


To help ensure that the sides of the tenons were sawn exactly in the right spot I used a chisel to cut a small notch at each knife line with the waste side sloped and the side that defines the tenon edge nice and straight. This notch helps locate the saw as you start cutting so that the tenons fit the mortise right off the saw. After sawing the sides of the tenon I marked off the waste areas to make it very clear what parts go and what parts stay.


I ended up cutting out this waste with the band saw, leaving just enough between the tenons to lock the shelf in the dado and prevent any cupping across the grain.


I was also very careful at the bandsaw to leave the little tabs at the front end of each shelf that will fill the exposed ends of the dados. You can see this below at the very far left corner.


In general the tenons fit the mortises right off the saw, but it did take some futzing to trim the front ends to fit just right. Too long and the shelf wouldn't seat fully into the dado and their would be gaps at the shoulders where the shelf meets the side, too short and there would be a gap at the exposed dado at the front of the shelf.  Below you can see a gap between the shoulders and the inside face of the shelf side... this one needs some trimming.


After paring down the end slightly the shoulders are tight and there is no gap at the front of the dado, success.


Once all the joints were fitted I did a dry run assembly to see how things were coming together and to check that all the joints fit together nice and tight all at the same time.


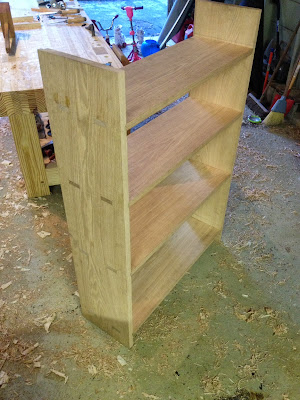
Its always fun the first time a project stands on its own.


The joints looked good so I pulled the assembly apart and started working on the curve at the top of each side. I used the dividers still set to the same distance used to space out the shelves and stepped down one step on each side to define the limits of the curve. I then used a flexible metal ruler and a piece of string to cobble together a makeshift drawing bow and used that to trace out the curve with a pencil.


I cut the curve on one side with the bandsaw and then used that side to mark the curve to be cut out on the other side.


I clamped the sides together and used a spokeshave to remove the saw marks and smooth the curves on both sides at the same time to ensure they were perfect mirror images.


The next step was to resaw some more red oak scraps from my pile and mill it down for the back boards. The boards mate together with a ship-lap joint cut with the dado stack to allow for the seasonal expansion and contraction.


Since these boards won't be very visible once the shelf is full of toys and books this was a good use of some less than perfect stock, a few knots won't hurt anything.


Lex then helped me re-assemble the shelf and mount the back boards so that I could draw out the curve across the top. She tried to run away when I started taking pictures so when I asked her to pose she made a silly face in protest.


I removed the back boards and cut the curve on each piece individually at the bandsaw, then mounted them all back on the shelf for final smoothing.


The spokeshave took care of the saw marks and evened out the curve nicely. I also used the spokeshave to add a small bevel to the top of the boards at each end where they mate with the perpendicular curve at the top of the sides to blend things together.


At this point all of the major tasks are done and I started to tie up a few loose ends and prep for finishing. There was one small chip out around a mortise that I missed earlier so I grabbed a sliver of oak off the floor that was about the right size to make a patch.


I applied a touch of glue and clamped the sliver in place to fill in the defect.


With the glue dry and the patch planed flush it basically disappeared.


One of the last steps before finishing was to hit all the surfaces with a smooth plane....way more fun than sanding and much more effective at removing the tearout that I have come to accept as inevitable when running red oak through the planer.


So far this project was still tracking on schedule but it had been a few weeks since initially flattening the boards and they had cupped slightly with the end of summer humidity changes. This made it tough to get the smooth plane into some of the dips and valleys so I needed to find another way to smooth those spots. I considered just sanding those areas but I was concerned that the different surface texture would take the finish differently than the planed areas and I really didn't want to sand the whole thing. I finally took the time to figure out how to sharpen and use a card scraper and was blown away how well it worked. Again, way more fun than sanding.


In order to ensure that this bookshelf survives just about anything little man would throw at it through his lifetime I may have gone a bit overboard with the joinery. The through tenons on each shelf are wedged from the outside into a flared mortise which is about as bomb-proof of a joint as you can get. I cut two saw kerfs on each tenon to accept the wedges during assembly.


I then marked a knife line to widen the outside of each mortise by just a hair. I then pared down from this line at an angle to intersect about half way into the mortise so that the outside half is flared slightly wider.


I the wedges from a scrap of oak and proceeded with assembly. I applied glue to the mortises and tenons and then assembled the shelf. I used clamps to tighten everything up and then adjusted the clamps to square up the shelves to the sides. I then put just a touch of glue on each wedge and drove them into the saw kerfs as pairs so that they flared the tenons evenly.


After the glue dried I removed the clamps and used a chisel to chop off the majority of the protruding wedges. The fact that the tenons themselves were proud of the side panel offered a bit of insurance in case the wedge broke below the tenon surface slightly. I then switched to a block plane to trim the remaining wedge bits and excess tenon length flush with the side. Most of the joints turned out really well with only a few small gaps on one or two of the joints.


Trimming the wedges and planing the tenons flush left some marks around each joint that needed to be cleaned up with a smoothing plane so I rigged up a few scraps on the bench to hold the shelf on its side. This allowed me to take full length passes with the smoother.


After a few passes the shelf sides, including the exposed end grain of the tenons, was nice and smooth once again. Here you can see the detail of the wedged tenons and the nice tight fit.


I generally prefer a simple clear finish leaving the wood a natural color but in this case Laura had requested something a bit darker. I took this as an opportunity to try out something new and settled on General Finishes Dye Stain (light brown). Dye gives the oak a much more consistent and even color compared to a pigment stain which tends to collect in the open pores and really highlight the grain. The dye stain also has just a bit of binder to lock in the dye which was very helpful in this case as I was planning on a wipe top coat. Without the binder the dye is likely to re-activate while wiping on the top coat creating streaks or dark splotches. After applying the dye and letting it dry I then wiped on 3 coats of a 50/50 polyurethane/mineral spirits blend.


I put on the last coat of finish a day before the deadline Laura had challenged me to and it was a perfect sunny windy day to let the shelf sit outside and off-gas most of the polyurethane stink.


I moved the shelf inside and Laura quickly loaded it up with toys, books, and other baby odds'n'ends.


My hope is that this shelf survives long enough to be handed down to little man's own little man some day.