2018 was a busy year and as I was reflecting back I realized I hadn't posted any project updates this year. While I didn't complete any major furniture projects this year I did check off a number of smaller projects.
In January Lon, Mark, and I had a "shop weekend" as a Christmas gift from our wives and I started off the year learning to use the new lathe by roughing out a number of bowl blanks. once roughed out I stuffed the blanks along with a bunch of the wet shavings into paper grocery bags to help them dry slowly and evenly. Throughout the year I continued to rough out blanks as I came across log sections and stash them away to dry. By the end of the year I had roughly a dozen rough turned bowls that survived the drying process along with a few casualties. One lesson learned was likely leaving the blanks in the bags with the wet shavings too long as many of them started to mold so I started removing the wet shavings after a few weeks and then removing the blanks from the bags altogether after another few weeks to let them finish drying stacked on the shelf.
Laura asked for some help turning some scavenged cabinet door frames into wall mounted succulent planters. The planters turned out ok but the live succulents didn't fair as well so at some point they were swapped out with faux plants that are doing much better.
In April I swapped out my 2005 F150 for a 2018 model and so far I've been really impressed with the 2.7l EcoBoost. Hopefully this one is as reliable as the old lariat and with the aluminum body I shouldn't have to worry as much about the body rust that ultimately drove this upgrade.
At the beginning of the year I had set a goal to get Alexis into the shop to work on a project together so we found a really nice section of crotch walnut and made a cheese slicer. I didn't get any pictures of the process but this was one of my favorite projects.
One of the biggest projects of the year was planting roughly 200+ tree seedlings in a half acre section of the side yard now formally known as the forest. I ordered the trees through both Outagamie and Waupaca county tree programs (25 white pine, 25 white spruce, 25 red oak, 25 swamp white oak, 25 hickory, 25 black cherry, and 50 hybrid poplar) and also transplanted about 5-10 small silver maple, red maple, and walnut seedlings we found in the flowerbeds and neighboring woods. I planned out a trail around the perimeter and cutting through the middle under the big silver maple and used roundup to kill a 3ft section of grass for each seedling.
Supposedly the trees are delivered before the last weekend in April every year like clockwork but this year blizzard Evelyn dumped almost two feet of snow in mid-April which complicated things for the nurseries and pushed tree planting into early May. This wasn't a huge problem but it did mean the seedlings missed 3 weeks of heavy spring rains that should have helped them get established so I ended up spending quite a bit of time watering the baby trees during some of the hot dry weather that came early in the summer. We lost a few trees but 90% seemed to have survived the first year and the hybrid poplars were absolutely amazing with a few of them growing 7+ feet this first year. I'm looking forward to reflecting back on this picture in 10-15 years when trees should all be decently sized and this view will look dramatically different.
After seeing how much the boys enjoyed playing in the dirt of the flowerbeds we finally broke down and built a sandbox between the house and the workshop.
With Miles finally sleeping through the night consistently it was time for him to move in with Eli and free up the extra bedroom for an office. I had planned on building a new set of bunk beds but Alexis was also looking to trade her loft bed for a "normal bed" so we moved that into the boys room and added the bottom bunk for Miles. So far the boys are really enjoying being roommates.
Another upgrade to the boys room was a rack/garage for the growing collection of monster trucks. The frame is rabbeted and joined with pocket hole screws with a plywood back and the whole assembly is sized just right to hold the pattern of 3" and 4" PVC sections.
In June we added a Golden Retriever/Lab mix named Cosmo to the family and as he and Sofie teamed up the explore the neighborhood much more frequently we decided it was time to install an invisible fence. In order to run the antenna wire across the driveways I used a cheap circular saw and masonry blade to cut a kerf just big enough for the wire and filled the rest of the kerf with asphalt crack filler. While I expected the driveways to be the hard part with the rented EZ Cable Installer making quick work of laying the wire in the sod it turns out that machine just barely works in the hard dry soil in late summer and this ended up being one of the least fun projects of the year. In the end it was worth it as the dogs quickly learned their boundaries and can now roam the yard freely without us worrying about where they will end up.
One of the other projects was the replace the retaining wall between the house and the shop. The old one was made of wooden 4x6's that were rotting and caving in so pulled that out and put in a block wall with an additional drain.
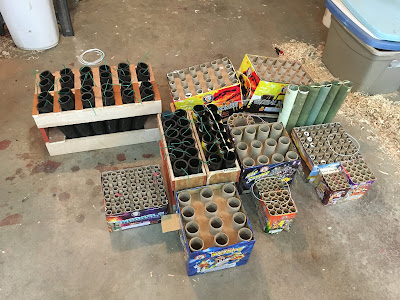
I've had a thing for fireworks since spending my allowance on bottle rockets as a kid and this year we picked up a mix of cakes and mortar shells for a backyard show on the 4th. Laura convinced me to try fusing together the pieces so I could light one fuse and sit back and enjoy the show and I was pleasantly surprised when everything went off as planned. The successful 4th of July show got me thinking about something bigger and badder for next year which led to building a set of mortar racks and making a wholesale order through Star Spangled Novelties in Mosinee. Being somewhat impatient we decided the boys combined birthday party in September was a great excuse to put on a show.
We applied for the necessary permit with the town and I setup a show consisting of 54 1.75" mortar shells and a dozen multi-shot cakes. I had choreographed the show and timed things out with various fuse lengths and speeds but the "quick fuse" ended up burning very slow and at some point one of the fuses to the finale caught fire mid-show which led to a slow start, a very impressive middle, and a few lingering cakes to finish things off slowly. I'm looking forward to giving this another shot for the 4th in 2019.
When I finally got out into the shop over the holidays I pulled out some of the rough turned bowl blanks to try my luck at finish turning the bowls. The first one was going fairly well when I took it just a bit too far trying to get a smooth surface on the inside and the bottom got too thin and reminded me why I wear a face shield.
The next attempt was a piece of boxelder from a tree in my parents yard that I climbed as a kid. I made it a bit further on this one and was able to actually sand and finish the inside. I made a quick jam chuck to attempt to finish off the foot of the bowl and quickly realized this blank was likely doomed from the start by having the inside of the bowl dip down too far such that I'd never be able to remove the tenon and still have a enough wood to leave a flat bottom for the bowl to sit on. I tried anyway and ended up breaking through the bottom proving this whole bowl turning thing is not as easy as it looks on YouTube.
As I look forward to 2019 I'm hopeful to get at least one finished bowl out of the dozen or so rough turned blanks I have dried. I also still need to finish the walnut nightstands I started more than a year ago and Laura has requested a multi-tiered stand for the growing collection of plants in the sunroom and there are plenty of other projects on the to do list.


